What is Amazon’s FBA Customer Return Policy?
When a customer is not satisfied with the purchase, a refund is issued to them. The customer will be required to return the item to Amazon Fulfillment Centre.
Once the item is received, Amazon will evaluate the condition of the item.
If the item is sellable, it is returned to your inventory and no compensation is due
OR
If the item is unsellable, they assess who caused the damage.
Then they decide if you are due for a reimbursement.
In this post, we will break down the process on how to inspect the returns and open a case with Amazon.
When you get a damaged product from Amazon, you should get reimbursed for that right?
Besides, it wasn’t your fault that the customer returned the item, but with missing parts!
You cannot resell the item anymore – even in USED condition.
What should you do?
Open a case with Amazon to get a reimbursement.
But, how?
I’m sure you have already heard that most of the time when you open a case; the Amazon representative will decline your request.
That is why I’m sharing my templates that I use when I contact Amazon Seller Support for my AMAZON REIMBURSEMENTS.
In my experience, these templates are highly proven and effective.
As a matter of fact..
99% of the time, Amazon agrees and reimburses me back!
How does Amazon Returns Really Work?
Many Amazon FBA Sellers get returns from customers that are mostly damaged or have missing parts. And if you don’t ask Amazon to send the units to you, you won’t have a chance to inspect them and ask Amazon for reimbursements.
So, what will happen then?
They will just destroy the units and leave that money off the table.
But, by following these processes, I was able to get back from Amazon more than $3000 in reimbursements this year alone!
Curious to know what are the steps I made?
I’ll show you exactly how!
STEPS IN CREATING A CASE
1. CREATE A REMOVAL ORDER
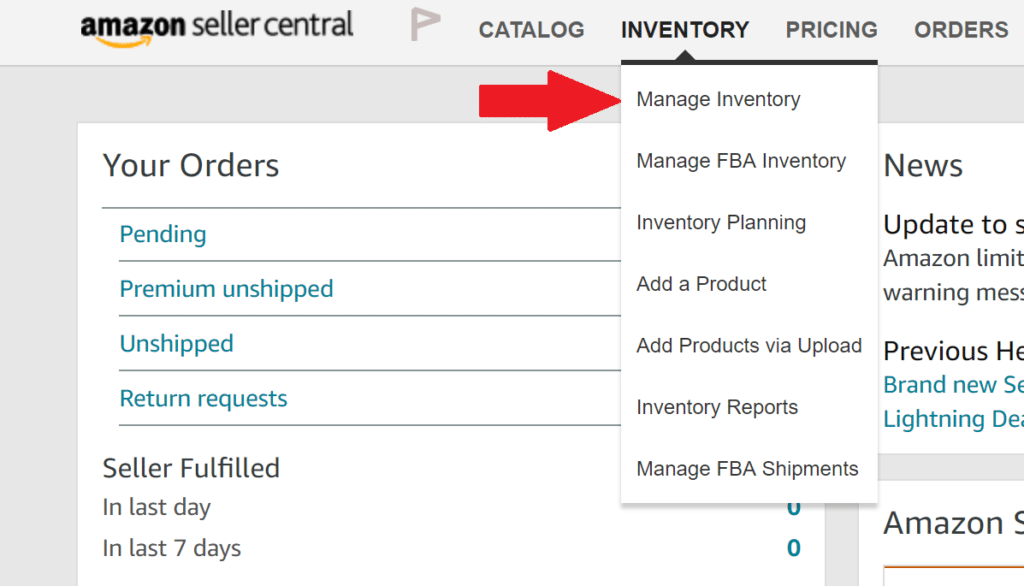
To have your inventory removed from an Amazon Fulfillment Center, you need to submit a removal order. You can do this by creating a removal order from the Manage Inventory page or the Recommended Removal report.

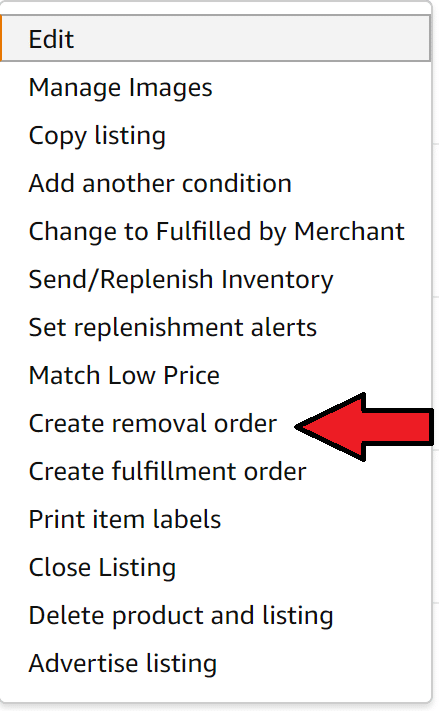
Step 1: On the Manage Inventory page, select the items you want to remove, and then select Create removal order from the Action on selected drop-down list.

OR
On the Recommended Removal report, click Begin removal process. If Begin removal process does not appear, you do not have any inventory that we recommend you remove.
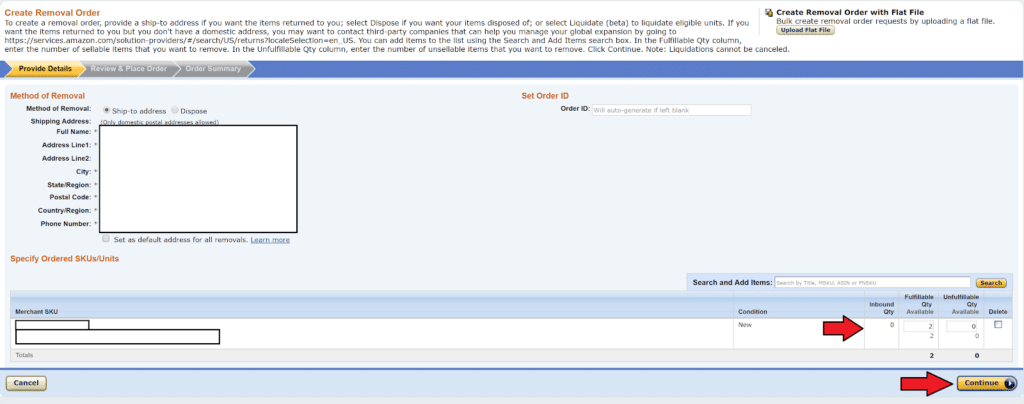
Step 2: On the Create removal order page, under Method of removal, do one of the following:

a.) Select Ship-to address to have your inventory returned to your designated recipient—for example, your own warehouse, the manufacturer, or a recycling center. Enter the address where you want the inventory shipped.
b.) Select Dispose of to have your inventory disposed of at the fulfillment center.
Step 3: For Set order ID, do one of the following: Enter a custom order ID or leave the field blank and an order ID will be created.
Tip: Save your removal order ID for tracking purposes.
Step 4: Under Product details, you will see the details of the selected items. To add inventory to the list, enter a title, MSKU, ASIN, or FNSKU in the Search and add items text box at the bottom of the page and click Search. Select the products you want to remove, and click Add selected.
Step 5: Under Fulfillable quantity for removal, enter the number of fulfillable units to remove. This quantity cannot be greater than the total quantity available for removal.
Step 6: Under Unfulfillable quantity for removal, enter the number of unfulfillable units to remove. This quantity cannot be greater than the total quantity available for removal.
Step 7: Under Fulfillable quantity and Unfulfillable quantity, review the total inventory, total inventory available for removal, and total inventory not available for removal.
Step 8: Check the product details to ensure the items listed are the ones you want removed. To change the items to be removed, click Add or Delete.
Step 9: Click Review.
Step 10: Review the order ID, method of removal, ship-to address, and the details of the selected items for removal.
Step 11: Click Confirm to complete the removal order. If you decide not to complete the removal order, click Cancel order.
Step 12: A pop-up message that reads, “Removal order has been placed” indicates your removal order submission has been successful.
Note: It can take up to 30 business days for inventory in your removal order to leave the fulfillment center.
2. INSPECT THE ITEMS
After receiving the items from Amazon, make sure that you inspect the items properly. If the condition of the item is:
- Not in the same condition as previously listed.
- Item is already defective and damaged
- Some parts of the unit or item is missing
These are considered unsellable and you can file for a reimbursement to Amazon.
Take pictures of all sides and all angles of the item with the LPN Label. Take enough good photos, as many good photos as you can.
Taking just one angle of the photo will slow down the process; you will keep going back and forth providing more pictures.
And the more communication you do with the Amazon representative, the more work it is for you – and of course headache!
Make everything smooth and quick. Take all pictures needed on one item, then move on to the next item.
What is an LPN Label?
License Plate Number (also known as LPN) is a unique number assigned to a returned item from Amazon. By providing the LPN to an Amazon Representative, they can easily associate it to the item where you want to file a reimbursement.
What do you need to prepare before filing a Case?
- Amazon Removal Order ID
- ASINs/FNSKUs and quantities affected
- LPN number if available
- Images of the affected units
- Images of the affected units’ product packaging
- Images of the packaging or the item with LPN
3. CREATE A REIMBURSEMENT CASE

To process a reimbursement claim, here are the steps:
- Log in to Amazon Seller Center
- Go to Help Section
- Click on Need More Help
- Click Get Support and choose Selling on Amazon
- Go to Products, Listings or Inventory and click on Other Issue
- Then write the issue or message on the box that says “Describe your Issue”
Now, here are some templates that I personally use for this part.
SAMPLE TEMPLATE 1
Dear Amazon Customer Service Representative,
I recently received the removal order number [Replace with removal order number on the paper you have received from Amazon]
Item number [LPN number] – [product name]
* [what is missing or damaged]
We are a small family business and we try to save any penny in order to survive with the big players here on Amazon.
Appreciate your assistance.
Regards,
[Your Name]
Remember!
Whenever you reach out with Amazon Associates, make sure that you communicate with respect and do it professionally.
Don’t get upset and be patient. It always pays to be nice, right?
There will be representatives who will say that it was your fault and you are not getting any reimbursements.
I know how frustrating it can be!
So here is a template that I use when responding to this kind of message:
SAMPLE TEMPLATE 2
Dear Amazon Customer Service Representative,
Thank you very much for the reply but you have to understand that we have inspected the items and they are totally functioning and in working condition.
Now the issue is that there are missing parts too, so please send me all the parts and I will leave you alone. But if you lost the part or the customer lost the parts, then you have to reimburse us for the whole kit because we cannot sell it again.
Appreciate your assistance.
Regards,
[Your Name]
I didn’t see anyone teaching this and I had to figure it out myself.
You can use it to your advantage, but do not abuse the system!
More about Amazon FBA returns
Do not file a claim if the items can be sold and if they are in a good condition.
Minor little scratches are not considered damaged and can still be used or sold.
Broken parts, visible heavy damages, item not working and missing parts are considered damaged and not sellable.
Do not lie. Do not make up stories.
Always do things in the right way. Make business professionally!
These processes are very straightforward and very simple.
Yet, not all sellers are doing it!
Would you believe that 95% of the sellers don’t do it?
Make it a part of your process to inspect the items as you receive them. And file a reimbursement claim if applicable.
Easy to do, and can help you save a lot of money.
I hope that you got good ideas from this article. And if you want a more in-depth walkthrough or if you have other questions about creating a reimbursement claim, please leave a comment below!

